Build Reactive REST APIs with Spring WebFlux – Part1

Reactive Programming

Photo by Michael Dziedzic on Unsplash

                                        In this article, we will see how to build reactive REST APIs with Spring WebFlux. Before jumping into the reactive APIs, let us see how the systems evolved, what problems we see with the traditional REST implementations, and the demands from the modern APIs.

If you look at the expectations from legacy systems to modern systems described below,

Reactive Programming, Spring WebFlux, Reactive REST APIs, Back PressureThe expectations from the modern systems are, the applications should be distributed, Cloud Native, embracing for high availability, and scalability. So the efficient usage of system resources is essential. Before jumping into Why reactive programming to build REST APIs? Let us see how the traditional REST APIs request processing works.

Traditional REST API Request/Response Model

Below are the issues what we have with the traditional REST APIs,

  • Blocking and Synchronous The request is blocking and synchronous. The request thread will be waiting for any blocking I/O and the thread is not freed to return the response to the caller until the I/O wait is over.
  • Thread per request → The web container uses thread per request model. This limits the number of concurrent requests to handle. Beyond certain requests, the container queues the requests that eventually impacts the performance of the APIs.
  • Limitations to handle high concurrent users → As the web container uses thread per request model, we cannot handle high concurrent requests.
  • No better utilization of system resources The threads will be blocking for I/O and sitting idle. But, the web container cannot accept more requests. During this scenario, we are not able to utilize the system resources efficiently.
  • No backpressure support → We cannot apply backpressure from the client or the server. If there is a sudden surge of requests the server or client outages may happen. After that, the application will not be accessible to the users. If we have backpressure support, the application should sustain during the heavy load rather than the unavailability.

Let us see how we can solve the above issues using reactive programming. Below are the advantages we will get with reactive APIs.

  • Asynchronous and Non-Blocking Reactive programming gives the flexibility to write asynchronous and Non-Blocking applications.
  • Event/Message Driven The system will generate events or messages for any activity. For example, the data coming from the database is treated as a stream of events.
  • Support for backpressure Gracefully we can handle the pressure from one system to on to the other system by applying backpressure to avoid denial of service.
  • Predictable application response time As the threads are asynchronous and non-blocking, the application response time is predictable under the load.
  • Better utilization of system resources As the threads are asynchronous and non-blocking, the threads will not be hogged for the I/O. With fewer threads, we could able to support more user requests.
  • Scale based on the load
  • Move away from thread per request With the reactive APIs, we are moving away from thread per request model as the threads are asynchronous and non-blocking. Once the request is made, it creates an event with the server and the request thread will be released to handle other requests.

Now let us see how the Reactive Programming works. In the below example, once the application makes a call to get the data from a data source, the thread will be returned immediately and the data from the data source will come as a data/event stream. Here the application is a subscriber and the data source is a publisher. Upon the completion of the data stream, the onComplete event will be triggered.
Data flow as an Event/Message Driven stream

Below is another scenario where the publisher will trigger onError event if any exception happens.

In some cases, there might not be any items to deliver from the publisher. For example, deleting an item from the database. In that case, the publisher will trigger the onComplete/onError event immediately without calling onNext event as there is no data to return.

Now, let us see what is backpressure? and how we can apply backpressure to the reactive streams? For example, we have a client application that is requesting data from another service. The service is able to publish the events at the rate of 1000TPS but the client application is able to process the events at the rate of 200TPS. In this case, the client application should buffer the rest of the data to process. Over the subsequent calls, the client application may buffer more data and eventually run out of memory. This causes the cascading effect on the other applications which depends on the client application. To avoid this the client application can ask the service to buffer the events at their end and push the events at the rate of the client application. This is called backpressure. The below diagram depicts the same.

Back Pressure on Reactive Streams

In the coming article, we will see the reactive streams specification and one of its implementation Project Reactor with some example applications. Till then, Happy Learning!!

Advertisement
Tagged with: , , , , , ,
Posted in Java, Reactive Programming

Jib – Containerize Your Java Application

                           Building containerized applications require a lot of configurations. If you are building a Java application and planning to use Docker, you might need to consider Jib. Jib is an opensource plugin for Maven and Gradle. It uses the build information to build a Docker image without requiring a Dockerfile and Docker daemon. In this article, we will build a simple Spring Boot application with Jib Maven configuration to see Jib in action. The pom.xml configuration with Jib is given below.


<?xml version="1.0" encoding="UTF-8"?>
<project xmlns="http://maven.apache.org/POM/4.0.0" xmlns:xsi="http://www.w3.org/2001/XMLSchema-instance" xsi:schemaLocation="http://maven.apache.org/POM/4.0.0 https://maven.apache.org/xsd/maven-4.0.0.xsd">
<modelVersion>4.0.0</modelVersion>
<parent>
<groupId>org.springframework.boot</groupId>
<artifactId>spring-boot-starter-parent</artifactId>
<version>2.2.5.RELEASE</version>
<relativePath />
<!– lookup parent from repository –>
</parent>
<groupId>org.smarttechie</groupId>
<artifactId>jib-demo</artifactId>
<version>0.0.1-SNAPSHOT</version>
<name>jib-demo</name>
<description>Demo project for Spring Boot</description>
<properties>
<java.version>1.8</java.version>
</properties>
<dependencies>
<dependency>
<groupId>org.springframework.boot</groupId>
<artifactId>spring-boot-starter</artifactId>
</dependency>
<dependency>
<groupId>org.springframework.boot</groupId>
<artifactId>spring-boot-starter-web</artifactId>
</dependency>
<dependency>
<groupId>org.springframework.boot</groupId>
<artifactId>spring-boot-starter-test</artifactId>
<scope>test</scope>
<exclusions>
<exclusion>
<groupId>org.junit.vintage</groupId>
<artifactId>junit-vintage-engine</artifactId>
</exclusion>
</exclusions>
</dependency>
</dependencies>
<!– The below configuration is for Jib –>
<build>
<plugins>
<plugin>
<groupId>com.google.cloud.tools</groupId>
<artifactId>jib-maven-plugin</artifactId>
<version>2.1.0</version>
<configuration>
<to>
<!– I configured Docker Image to be pushed to DockerHub –>
<image>2013techsmarts/jib-demo</image>
</to>
<auth>
<!– Used simple Auth mechanism to authorize DockerHub Push –>
<username>xxxxxxxxx</username>
<password>xxxxxxxxx</password>
</auth>
</configuration>
</plugin>
</plugins>
</build>
</project>

view raw

pom.xml

hosted with ❤ by GitHub

After the above change, use the below Maven command to build the image and push that image to DockerHub. If you face any authentication issues with DockerHub, refer https://github.com/GoogleContainerTools/jib/tree/master/jib-maven-plugin#authentication-methods


mvn compile jib:build

view raw

Maven Build

hosted with ❤ by GitHub

Now, pull the image which we created with the above command to run it.


docker image pull 2013techsmarts/jib-demo
docker run -p 8080:8080 2013techsmarts/jib-demo

view raw

Docker Jib Run

hosted with ❤ by GitHub

That’s it. No more additional skill is required to create a Docker Image.

Tagged with: , , ,
Posted in Containers, Java

Are you ready to adopt Serverless Computing?

                      FaaS (Function as a service), one of the newer types of services offered to the industry, came along with the advancement of cloud architectures. This is known as Serverless Computing/Serverless Architecture. In simple terms, serverless architecture abstracts all layers except the application’s development. So, the developers can concentrate only on the business requirement development. Serverless offers event-driven services to trigger functions that are created in development environments and hosted by the cloud provider, usually holding a piece of business logic.

                    The serverless architecture allows for a particular kind of pricing. Cloud providers normally charge only for the execution of the code, providing a more cost-effective platform than their counterparts like Infrastructure as a Service(IaaS), Platform as a Service(PaaS). The low operating costs, a short time to market, increased process agility are the main reasons for serverless computing to become a popular architectural paradigm. From a developer perspective, faster development environment set up, easier operational management, and zero system administration are the boosting benefits. Serverless has cost-effective pricing based on resource consumption, usually divided as 

  1. allocated resources such as memory, CPU or network
  2. the time the application functions run (including in millisecond intervals) and the number of executions. 

The benefits of serverless architectures and their capabilities are explained below.

Scalability: A provider can guarantee that the functions deployed are available and that their services are resilient. so that users do not have to be concerned about scalability concerns.

High Availability: Through serverless computing, the ‘ servers ‘ themselves are deployed automatically in several availability zones, so that they are always available for the requests coming from across the globe.

Rapid Development & Deployment: Adopting serverless computing solutions such as AWS Lambda or Azure Functions can greatly reduce the cost of development. You can get rid of buying infrastructure, setting it up, capacity planning, deployment environment setup and maintaining the infrastructure, etc, tasks. Developers only need to focus on the business requirement to develop and deliver.

Agile Friendly: FaaS systems allow developers to focus on the code and make their product feature-rich through agile cycles of build, testing and releasing.

Finally, although serverless has many benefits, it also has some disadvantages as discussed below. 

Cold Start: In the world of serverless computing, the functions are run when needed and thrown away when not needed. When needed the code of the function will be downloaded, starts a new container, bootstrap the code to start responding to the events. This phenomenon is called “Cold Start”. The length of the cold start introduces latency to your application.

Vendor lock-in: The cloud provider manages everything, so the developer or the client has no complete control of resource use and management. Lock-in can apply at the cloud providers API level. The way you call AWS Lambda or Google Functions into your serverless code may vary. Coupling your code too tightly to the APIs of a serverless vendor may make moving the code to another platform more challenging. There is another vendor lock-in where we are bounded to use only the services available with that cloud vendor. For example, AWS Lambda’s use of Kinesis as a source trigger for streaming the data. An organization that wants to use another streaming technology, like Apache Kafka, can’t use it on AWS Lambda.

Challenges with Unit testing and Integration testing: Serverless applications are hard to test due to the distributed nature. In a traditional development environment, developers tend to mock the services to perform the unit testing and have control of the services to perform integration testing. But, the same is not that easy with serverless applications. Due to this, it is important to invest time and effort during the serverless application design.

According to technology research firm Gartner, by 2022, serverless technology will be used by 10 percent of IT organizations. Based on Grand View Research’s perspective, the compound annual serverless growth rate is expected to be 26 percent ($19.84 billion) by 2025 in the long run.

Recently Cloud Native Computing Foundation initiated CloudEvents which is organized via the CNCF’s Serverless Working Group .  With CloudEvents we can majorly address Vendor Lock-in issue.  As per that, CloudEvents, a specification (spec) for describing event data in a common way, eases event declaration and delivery across services, platforms, and beyond. In reaching v1.0 and moving to Incubation, the spec defines the common attributes of an event that facilitate interoperability, as well as how those attributes are transported from producer to consumer via some popular protocols. It also creates a stable foundation on top of which the community can build better tools for developing, running, and operating serverless and event-driven architectures.  An increasing number of industry stakeholders have been actively contributing to the project, including AWS, Google, Microsoft, IBM, SAP, Red Hat, VMware, and more, cementing CNCF as the home of serverless collaboration for the leading technology companies around the world.”

In the coming article, we will see some Serverless examples. Till then, Happy Learning!!!

Tagged with: , , ,
Posted in Cloud Computing

How the Financial Industry is getting disrupted with AI?

Tagged with: ,
Posted in Papers

Are you ready to see GraphQL in action?

GraphQL                      In the last article, we have discussed GraphQL advantages over REST. In this article, we will see GraphQL in action. I have created a sample application to showcase differences between REST and GraphQL. First, we will see the REST implementation of simple product detail endpoint. I have used Spring Boot to demonstrate REST. Download sample project and follow the steps outlined in README to set up the project. I am not discussing setup details here as it is out of scope for this article. Assuming that your project is up and running to make a call to http://localhost:8080/product/{product_id} endpoint to get product detail JSON as shown below.

rest.gif

If you observe above JSON, we are getting entire product JSON including reviews and technical specifications though we are not interested in all the elements of a given product.

                   Now we will see GraphQL in action by getting product details in a selective manner. To demonstrate GraphQL again I used Spring Boot. Download sample project and follow the steps outlined in README to set up the project. I am not discussing setup details here as it is out of scope for this article. Assuming that your project is up and running to see GraphQL in action. In this case, I am interested to get only product id, title, short description and list price of a given product. Let us see how we can query to get interesting details.

grapgql.gif

Now as a service consumer I am interested to get product id, title, short description, list price, and reviews. In this case, GraphQL gives the flexibility to query what we want. See below query and response when we use GraphQL.

graphql2.gif

To demonstrate GraphQL I have used GUI based plugin GraphiQL. For consuming from other applications we can configure endpoint in application.properties.


graphql.servlet.mapping=/graphql
graphql.servlet.enabled=true
graphql.servlet.corsEnabled=true

Now we can make a call to the above endpoint by passing  URL encoded query parameter as shown below. You can learn more about query and mutations https://graphql.org/learn/queries/

GraphQL_Query

Hope you enjoyed this article. I will come back with another article. Till then, Happy Learning!!!

Tagged with: , , ,
Posted in GraphQL, Spring Boot

Are you ready to adopt GraphQL?


GraphQL                             In this article let us explore GraphQL. Let us first understand what GraphQL is? GraphQL is a specification from Facebook. GraphQL is a query language for APIs and runtime for fulfilling those queries with your existing data. GraphQL gives clients the power to ask for exactly what they need and nothing more by avoiding over fetching or under fetching of data. We can understand it more when we are going to see GraphQL implementation in action. Till then hold your curiosity. 

Wait, Wait… So far we are using REST(Representation State Transfer) to expose our services as APIs. Let us ask some questions ourselves before getting deeper into GraphQL.

Why do I need to adopt GraphQL?
What problems am I facing with REST APIs? How GraphQL solves those?
                     To answer the above queries let us take a use case to build an e-commerce application for web, mobile and native clients. We decided to expose APIs for various e-commerce functionalities.  For example, I have product detail REST API which gives specific product information as JSON which includes product data attributes, specifications data, reviews data, etc. As we are having many attributes in product JSON, the size of it is more.  Each client (web and thin clients(mobile and tablets))  has it’s own front end requirements to display product data as they have different screen sizes, memory, network bandwidth, etc. Now my clients started consuming product detail API. Though mobile and tablet interfaces don’t require entire product JSON as web, still product detail API is giving entire product data. It is evident that clients don’t have control over the data what they want from the server. This is called over fetching. The pictorial representation of REST over fetching issue is given below.REST                        We can solve over fetching issue with various approaches. The straight forward approach is to maintain different APIs for thick and thin clients. Though this design solves over fetching issue but has other problems like code maintenance,  implementation of enhancements across different APIs, deployment of thick, thin client APIs, more compute, more manpower, etc., which puts more cost to project. The other approach is having middleware to intercept the client request. Based on client request filter the response to return. This adds an additional layer to the application which has the same issues as the previous approach.

                   Now let us discuss the second issue with REST called under fetching. To avoid over fetching, we decided to create granular APIs so that clients will make API calls for whichever the data they required. Let us take a product detail page for the web. It has product information, specifications and reviews to display. Now to render product detail page client is not going to get data in a single API call. So client needs to make multiple API calls (like basic product API, specification API, Reviews API) to cater to its data requirement. This design has performance issues with an increased number of round trips to the backend server and APIGateway. The other issue is requiring more computing power and network as rising in the number of requests to serve. Below is a pictorial representation of under fetching.REST Under Fetching                 Let us see the third issue with REST that is, evolving APIs with versions. Any API will evolve as business needs will change with time. As per our customer needs, we might need to add data attributes(most of the cases we won’t remove data attributes as we need to have backward compatibility) to existing APIs. When we do any changes to existing APIs, we need extra vigilant as the changes might break the clients. To avoid that we will do versioning of APIs as and when we plan to release changes to existing APIs. When we introduce new versions which put the burden of managing more APIs(i.e. more compute power, more manpower), planning to deprecate older versions. Discipline and communication are needed when we have more versions of an API. With REST we cannot do silent releases.

                  The above issues are leading us to look for another solution called GraphQL. We will see how GraphQL addresses the above-said issues by implementing an API in the upcoming article. Meanwhile, let us see the request and response paradigm with GraphQL and how GraphQL makes clients happy by serving what they want.GraphQL Here are some of the adopters of GraphQL https://graphql.org/users/.
In the coming article, we will see the implementation of an API with GraphQL. Till then Spread love for APIs!!!


Tagged with: , , ,
Posted in GraphQL

APIGEE: CI/CD Pipeline for API Proxies

Apigee

                                       In this article, we will see how to create a CI/CD pipeline for APIGEE API proxies. I have referred a couple of articles on APIGEE community on the same topic. Those gave some idea on how to setup CI/CD pipeline for API proxies. Here are the tools which I have used to setup CI/CD.

  1. Jenkins
  2. NodeJs
  3. apigeelint
  4. newman
  5. APIGEE Management APIs

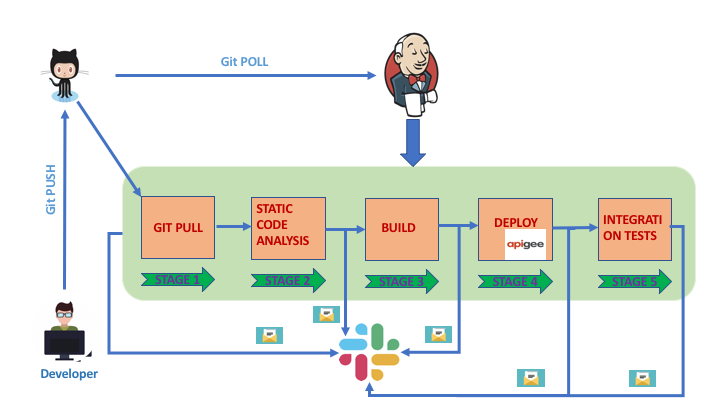
Make sure that you have created APIGEE edge account and a sample proxy to start with.  Below is the architecture diagram which shows the CI/CD pipeline and the stages involved. You can use this as a baseline CI/CD for your projects and can enhance it based on your requirements.

APIGEE_CI_CD

Here are the steps I have implemented in CI/CD pipeline.

  1. Developer pushes the API proxy code to GIT.
  2. Jenkins polls GIT and starts CI/CD Stage 1 based on GIT changes.
  3. As part of Stage 1, the code will be pulled into the workspace.
  4. In “Static Code Analysis” stage, the code will be analyzed for any violations of best code practices and anti-patterns usage. If this stage is the success it proceeds with the build stage. After each stage completion either success or failure, the notification will be sent to Slack channel.
  5. As part of the build stage, we will create APIGEE API proxy bundle.
  6. In the Deploy stage, I used APIGEE management APIS to deploy the API proxy bundle.
  7. Once the deployment is successful, then the integration tests will be triggered. I used Newman to do integration tests. Newman requires integration tests collection file as input. The test cases can be created easily with Postman
  8. In all the stages the notifications will be triggered to Slack channel.

There are some enhancements which I will do in the coming days. Below are some of the changes which I will target as enhancements.

  • Adding email, Hipchat notifications
  • Revert the API proxy to a previous revision if the integration tests fail.
  • If integration tests success, promote build to load test environment and run load test scripts.

The setup and project used as part of this article are available on GitHub. Till then, Spread love for APIs!!!

Apigee Message Logging Policy Demo


Tagged with:
Posted in APIGEE

APIGEE API gateway log management with ELK(Elastic Search, Logstash and Kibana)

Apigee

                  In this article, we will see how we can manage logs generated by APIGEE API gateway with Elastic Search, Logstash and Kibana. The below diagram highlights how log data flows through ELK stack for data visualization and monitoring.

apigee_log_management

As part of the API gateway, we will use MessageLogging policy to capture API proxy logs at proxy flow, target flow and post client flow based on the requirement. As of today, MessageLogging policy supports Syslog and file-based logging(available for only on-premise installations). Below is MessageLogging policy configuration to send logs to the syslog server.


<?xml version="1.0" encoding="UTF-8" standalone="yes"?>
<MessageLogging async="false" continueOnError="false" enabled="true" name="TestEnv-Message-Logging">
<DisplayName>TestEnv Message Logging</DisplayName>
<Syslog>
<Message>{messageId}|{apiproxy.name}|{response.status.code}|{target.received.start.timestamp}|{target.received.end.timestamp}|{environment.name}|{client.received.start.timestamp}|{client.sent.end.timestamp}</Message>
<Host>127.0.0.1</Host>
<Port>514</Port>
</Syslog>
</MessageLogging>

Now we will see logstash configuration to ingest data from syslog to logstash. Here I am not giving steps to setup ELK as that is out of scope.


input {
file {
path => "/Users/sjana/Documents/POC/ELK/APIGEE_LOG.log"
start_position => "beginning"
sincedb_path => "/dev/null"
}
}
filter {
csv {
separator => "|"
columns => ["MessageId","API_PROXY_NAME","RESPONSE_STATUS_CODE","TARGET_RECEIVED_START_TIME","TARGET_RECEIVED_END_TIME","ENVIRONMENT_NAME","CLIENT_RECEIVED_START_TIME","CLEINT_SENT_END_TIME"]
remove_field => "message"
}
}
output {
elasticsearch {
hosts => "http://localhost:9200&quot;
index => "apiproxies-log"
}
stdout {}
}

Once Syslog data is ingested successfully to Logstash we can configure visualization based on available fields in the index. Below is sample visualization created for API proxy response status codes.

kibana_visualization

In coming articles we will discuss another topic. Till then, Spread love for APIs!!!

Tagged with: ,
Posted in APIGEE

APIGEE – An Introduction to API Gateway

Apigee

In this article I want to give brief introduction about APIGEE. Mainly APIGEE offers below functionalities out of the box as api gateway.

  1. Protocol Transformation
    Transform from or to any protocol including SOAP, REST, XML binary, or custom
  2. Traffic Management
    Flexible, distributed quota management, rate limiting, and spike arrest policies out-of-the-box
  3. API Security
    Built-in support for address filtering, JSON and XML schema validation, and bot detection
  4. Data Access & Security
    Two-way SSL/TLS, API key validation, OAuth1, OAuth2, SAML, CORS, encrypted store, and HIPAA and PCI compliance
  5. API Products
    Create different tiers by packaging APIs with varying rate limits and pricing
  6. API Analytics
    Fine-grained performance monitoring, including anomaly tracing and drill-down and usage metrics related to apps, developers, and APIs
  7. API Monetization
    Flexible rate plans, international billing, and usage tracking
  8. Global Policy Management
    Enforce consistent security and governance policies across all APIs
  9. Developer Portal
    A customizable portal for API providers to manage developers, APIs, and API documentation and versioning

APIGEE sits between service consumers and backend services. As an API gateway, APIGEE takes care of common functionalities required for the APIs. Hence backend services can concentrate only on the core business logic. The below digram  depicts where exactly APIGEE fits.

APIGEE

Now we will see how the request and response goes through APIGEE. Every client request will go through proxy and target endpoints where we will attach APIGEE policies. Policy is nothing but a simple module which will provide common API functionality which we can configure using XML. In each flow APIGEE exposes lot of flow variables.

APIGEE (2).png

Below are list of policies available out of the box which you can attach to proxy and target flows.

APIGEE (3)

If you want to experience APIGEE edge, follow below steps to create trail account.

  1. Goto https://login.apigee.com/sign_upEnter the required information to create account with APIGEE.
  2. After activating APIGEE account, login to https://login.apigee.com/login access Apigee Edge management UI

Below are some of the reference materials to deep dive into APIGEE


Tagged with:
Posted in APIGEE

APIGEE – Can we configure parameters for Message Logging Policy?

Apigee

Apigee MessageLogging policy has limitation to use configurable parameters such as Syslog server host, port, etc. details. If we are not going to configure these parameters we may get into trouble while moving the proxy from one environment to another environment. To achieve the portability the approach is to have MessageLogging policy for each environment. Based on the environment in which the proxy is running the policy will be applied. Below is the sample proxy with message logging policy for each environment. The proxy definition is given below.


<?xml version="1.0" encoding="UTF-8" standalone="yes"?>
<ProxyEndpoint name="default">
<Description/>
<FaultRules/>
<PreFlow name="PreFlow">
<Request/>
<Response/>
</PreFlow>
<PostFlow name="PostFlow">
<Request/>
<Response>
<Step>
<Name>TestEnv-Message-Logging</Name>
<Condition>environment.name = "test"</Condition>
</Step>
<Step>
<Name>ProdEnv-Message-Logging</Name>
<Condition>environment.name = "prod"</Condition>
</Step>
</Response>
</PostFlow>
<Flows/>
<HTTPProxyConnection>
<BasePath>/messgageloggingdemo</BasePath>
<Properties/>
<VirtualHost>default</VirtualHost>
<VirtualHost>secure</VirtualHost>
</HTTPProxyConnection>
<RouteRule name="noroute"/>
</ProxyEndpoint>

The test and prod environment MessageLogging policy configuration is given below.


<?xml version="1.0" encoding="UTF-8" standalone="yes"?>
<MessageLogging async="false" continueOnError="false" enabled="true" name="TestEnv-Message-Logging">
<DisplayName>TestEnv Message Logging</DisplayName>
<Syslog>
<Message>{environment.name}</Message>
<Host>10.0.0.1</Host>
<Port>556</Port>
</Syslog>
</MessageLogging>


<?xml version="1.0" encoding="UTF-8" standalone="yes"?>
<MessageLogging async="false" continueOnError="false" enabled="true" name="ProdEnv-Message-Logging">
<DisplayName>ProdEnv Message Logging</DisplayName>
<Syslog>
<Message>{environment.name}</Message>
<Host>10.0.0.2</Host>
<Port>448</Port>
</Syslog>
</MessageLogging>

The proxy demonstrated is available on GitHub to download and play with it.

Apigee Message Logging Policy Demo

Tagged with:
Posted in APIGEE
Dzone.com
DZone

DZone MVB

Java Code Geeks
Java Code Geeks
OpenSourceForYou